LAMP Server Pentesting
The following pentesting was carried out in a virtual environment. It should not be implemented on a live server unless you have permission to do so!
Prerequisites
- LAMP Server configured with WordPress
- Kali Linux with OpenVAS and Nessus installed
The aim of the server pentesting is to identify any vulnerabilities and fix them to secure the server as much as possible.
NMAP
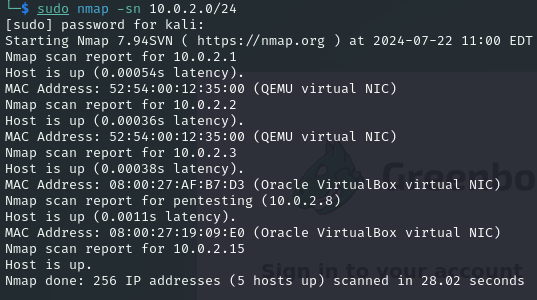
To get a list of the ip addresses in the target network use the following command:
- sudo nmap -sn 10.0.2.0/24

The ip address of the LAMP server ‘pentesting’ is 10.0.2.8
Run NMAP again to get the list of ports and the services running on the target machine using:
- sudo nmap -sV 10.0.2.8

This shows ports 22 and 80 open, software versions on these ports and that it is a Linux machine.
Vulnerability Scanning
Next, is to scan the server with OpenVAS and Nessus vulnerability scanners. It is best to use more than one vulnerability scanner on a target machine.
OpenVAS
Use the following commands to run OpenVAS on Kali Linux:
- gvm-start
- Go to: https://127.0.0.1:9392
- Enter the username and password
From here, go to Scans, click ‘task wizard’ on the top left, enter the ip address of the target machine and click ‘start scan’.
The following are the five results found by the OpenVAS scan that need action. 25 results were returned of which 20 are ‘log’ level with severity of 0.0. There are no vulnerabilities that can be exploited using Metasploit.

Nessus
Run Nessus on Kali Linux using the following commands:
- /bin/systemctl start nessusd.service
- Go to https://127.0.0.1:8834/
- Login with username and password
On the top right click on ‘new scan’ and then select ‘Basic Network Scan’. Fill in the name, description and target and save the details. Start the scan on the next page by highlighting it and clicking the play button.
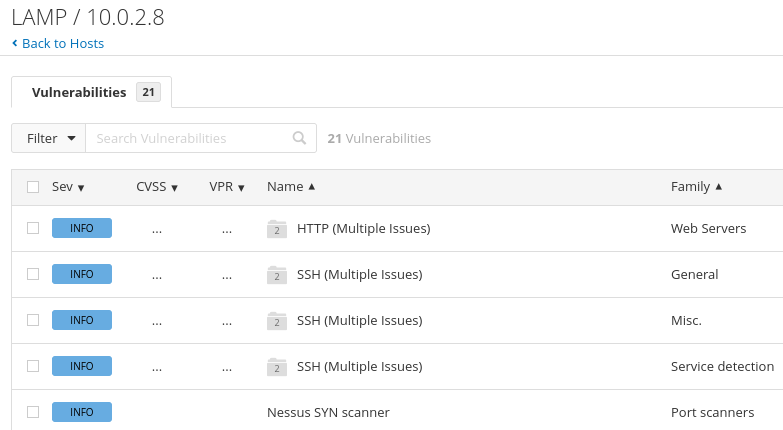
The following are the results found by the scan. Nessus reported 21 ‘information’ messages and no medium or severe results were found.

No further action is needed for the results of this scan
Secure The Server
The 5 results returned from the OpenVAS vulnerability scanning will now be investigated
WordPress User IDs and User Names Disclosure
This vulnerability shows that WordPress uses an ‘author’ parameter that represents a user id and is generated consecutively for each new user. This can reveal the username and id of users who created the website or any pages by going to the following URL (with each id):
- http://yourwebsite/?author=id
This redirects to a page that gives the username. An attacker could then try to login with the username and brute force the password.
There is no known solution for this vulnerability
phpinfo() Output Reporting (HTTP)
This vulnerability shows that files containing the output of the phpinfo() file created when setting up the LAMP server were not removed. This file includes sensitive information.
The solution here is to delete the file.
Go to /var/www/html or /var/www/yourwebsite (or both) on the LAMP server and use the command sudo rm info.php to remove it
Cleartext Transmission of Sensitive Information via HTTP
This vulnerability shows that sensitive data such as usernames and passwords are transmitted without being encrypted which affects the WordPress login page. The solution here is to secure the WordPress website with an SSL certificate. Then, using HTTPS instead of HTTP will encrypt the transmission of the data. This won’t be implemented in the test environment.
Weak MAC Algorithm(s) Supported (SSH)
This vulnerability shows that the remote SSH server allows weak MAC algorithms that use symmetric key cryptography. These are:
- umac-64-etm@openssh.com
- umac-64@openssh.com
The solution here is to disable the weak MAC algorithms reported.
To get the list of currently used ciphers use the following command:
- sudo sshd -T | egrep ‘^macs’

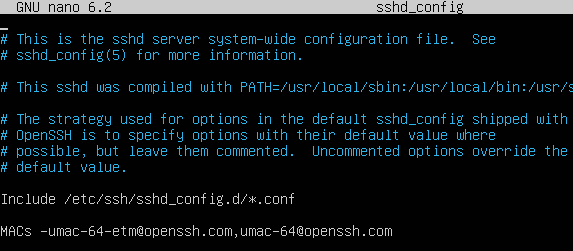
Open the sshd_config file and add the following line:
- sudo nano /etc/ssh/sshd_config
- MACs -umac-64-etm@openssh.com,umac-64@openssh.com

Restart the sshd service and check the ciphers being used again:
- sudo systemctl restart sshd
- sudo sshd -T | egrep ‘^macs’

You can now see that the 2 weak algorithms have been removed from the list.
TCP Timestamps Information Disclosure
This vulnerability allows you to compute the uptime of the server by using timestamps.
The solution to disable this is to add the line:
- ‘net.ipv4.tcp_timestamps = 0’ to /etc/sysctl.conf

- Use the command ‘sysctl -p‘ to apply the setting
End Result
Run the OpenVAS vulnerability scan again to see that the solutions were successful.
There are now only 2 issues left, one that can’t be fixed and the second easily fixed on live website by installing an SSL certificate.
